
Pelargonium, a plant with bright colors and an intoxicating fragrance, is one of the most popular flowers for decorating balconies and gardens. With its dazzling petals that turn red, pink, purple, or white, pelargonium is an explosion of beauty that attracts everyone’s attention. But do you know how to best care for it? And above all, have you ever thought about propagating it to create a pelargonium in a bush? Here’s how.
Pelargonium, also known as geranium, is an ornamental plant that conquers with its beauty and versatility. Native to southern Africa , pelargonium has spread throughout the world thanks to its incredible ability to adapt to different climates and environments. This plant features dense foliage and brightly colored flowers that make any space more cheerful and welcoming . It is perfect for beautifying balconies, terraces, or gardens with a touch of color and elegance.
But what exactly is pelargonium? It’s a plant belonging to the Geraniaceae family, characterized by fleshy leaves and flowers grouped in showy inflorescences. There are different varieties of pelargonium, each with its own aesthetic characteristics and cultural requirements.
One of the main reasons for the success of pelargonium is its ease of growth and maintenance . This plant requires little maintenance and is resistant to common garden flower diseases. However, there are some basic guidelines for ensuring proper cultivation of pelargonium.
To keep your pelargonium healthy, make sure to place it in a sunny spot but away from direct wind. Water the plant regularly, avoiding stagnant water in the saucer . It’s also important to fertilize your pelargonium during the flowering season. But let’s see how to turn any pelargonium into a bush.
How to care for a pelargonium
Pelargonium is a plant highly valued for its beauty and resilience. However, like all plants, it requires proper care to thrive. Here are some tips on how to care for a pelargonium.
Specific care for a pelargonium
First, it’s important to choose the right potting soil for your pelargonium . This plant prefers well-drained, nutrient-rich soil. Make sure the pot or flower bed you’re growing it in has good drainage and use a potting soil specifically designed for flowering plants .
Another essential thing is proper watering of pelargoniums. Avoid watering them too often, as they do not tolerate overwatering. Wait for the soil to dry out slightly before watering again. Then, make sure to place your pelargonium in a sunny spot. These plants love direct sunlight and need it to thrive and produce abundant flowers.
Also, don’t forget to prune your pelargonium regularly. Remove dead flowers as they appear and trim any dry or damaged parts of the plant to encourage healthy new growth.
By following these simple tips, you can ensure a long life for your beloved pelargonium on the balcony or in the garden. And take care of it carefully, avoiding small mistakes that can jeopardize its growth. And in addition to the main treatments, let’s find out how to turn any pelargonium into a bush.
The main techniques for processing any pelargonium
The main techniques for propagating pelargoniums can be very useful for growing more plants of this beautiful flower variety and creating a beautiful bush. There are several methods you can use, depending on your preferences and available resources.
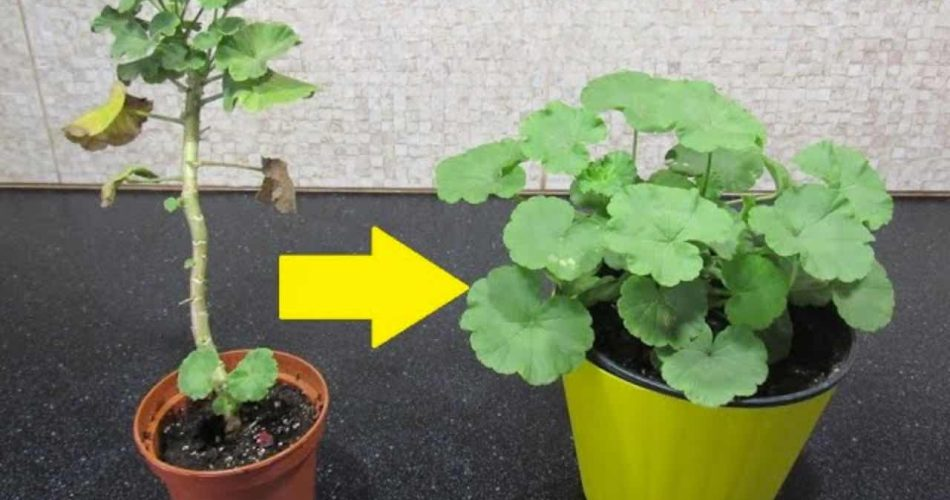
How to turn it into a bush
One of the most common techniques is cutting. To do this, simply cut a portion of the stem from a healthy, strong plant, making sure to include some leaves in the section you cut. Then, the cutting is placed in a pot with fresh, well-drained potting soil, keeping the soil slightly moist until roots begin to appear.
Another effective technique is grafting. This method requires more skill and attention because it involves combining two different plants, taking the shoot or upper part of a desired plant (the rootstock) and grafting it onto the trunk or base of another plant (the scion ) . It is important that the two parts fit together perfectly so that the graft can adhere well. And the result that will come out will be truly stunning, in fact for this technique, it is also possible to use two geranium branches of different colors.
Finally, there is also the possibility of propagating pelargoniums by dividing the clumps. This method can be practiced in spring or early summer when the plants are still young and vigorous. Simply gently separate the clumps from the mother plant using a sharp knife or a clean pair of scissors , and plant them in another pot. Always remember to use a potting soil suitable for this type of plant, and to make a drainage layer at the bottom of the pot.
Five minutes, pelargonium in a bush
Five minutes can make the difference between a simple pelargonium and a magnificent bush of colorful flowers. If you have a pelargonium on your balcony or in your garden and want to make it a real eye-catcher , follow these simple steps to propagate it quickly.
Five minutes, pelargonium in a bush
The main technique for growing more pelargonium plants is taleggio. Take a healthy plant with well-developed branches and cut off some of its side twigs. Make sure each branch has at least 3-4 nodes , as this is where the new roots will grow.
Next, we take our cut twigs and gently remove all the leaves from the lower half of the branch . This will ensure that all of the plant’s energy goes into root growth instead of feeding the leaves. Now let’s fill a small pot with moist soil and make a hole in the middle to insert our twig without damaging the top nodes . We cover the bottom of the stem well with soil and apply gentle pressure around it to stabilize it. Don’t pack the soil down too tightly or the roots will suffocate.
Finally, let’s place our new seedling in full sun but avoiding direct exposure to intense rays during the hottest hours of the day. Being fragile, and the sun too strong, you risk burning it completely. So keep it constantly hydrated by spraying water on the upper part of the plant , this should be done when it is positioned in the shade and the internal soil does not have a high temperature.
Now that you have mastered this simple technique, all that’s left is to turn the pelargonium into a bush.