
on Growing Potted Orange Trees from Store-Bought Orange Seeds
Embarking on the adventure of growing orange trees in pots from seeds found in store-bought oranges can be an extremely rewarding experience. This guide offers a comprehensive, step-by-step approach to successfully germinating, nurturing, and ultimately enjoying the fruits of your labor.
share 53
Step 1: Selecting premium oranges for seeds
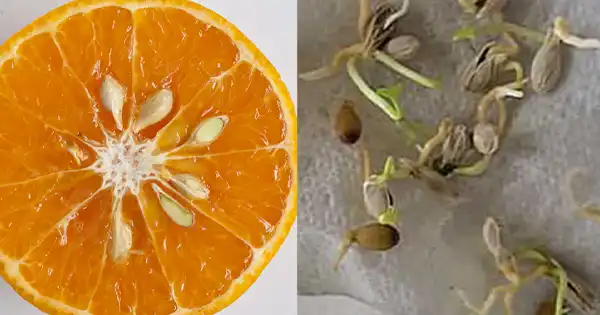
The process begins by choosing a high-quality store-bought orange. Look for oranges with firm, unblemished skin, a bright color, and a smooth texture. Discard any fruit with soft spots, mold, or bruises. Also, choose oranges with visible seeds, as these are essential for planting. The variety can be tailored to personal taste, and selecting fully ripe fruit increases the chances of obtaining viable seeds.
Step 2: Extraction and preparation of seeds
Once you’ve selected a suitable orange, gently extract the seeds from the flesh. Make sure the seeds remain intact during this process. After extracting, clean the seeds by gently removing the pulp from the fruit. Rinse the seeds thoroughly under running water and let them air dry for a day or two before sprouting.
Step 3: Germination in a damp towel
Germination marks a crucial phase in your orange tree’s growth journey. By creating the ideal environment for seed germination, you can prepare the ground for healthy seedlings. Place clean, damp paper towels in a resealable plastic bag and place the orange seeds inside, creating a humid environment for germination. Place the bag in a warm, dimly lit area to encourage growth.
Step 4: Monitor germination progress
Monitoring germination progress is essential to ensure seed success. The seeds will swell after absorbing moisture, and tiny white roots will emerge after a few days to a week. This indicates active growth. Monitoring these steps allows for timely care and transplanting.
Step 5: Transfer the sprouted seeds into pots
Transplanting sprouted seeds into pots is an important step toward growing healthy young orange trees. Select well-drained pots, prepare a well-draining potting mix, and carefully plant the seedlings. Proper watering and gradual exposure to sunlight are essential at this stage.
Step 6: Provide optimal seedling care
Ensuring the health of your young orange trees is essential. Gradually acclimate them to light, maintain proper humidity levels, and adhere to appropriate temperature and humidity conditions. Timely fertilization, careful pruning, and protection from harsh elements are essential parts of this phase.
Step 7: Feed the young orange trees
small orange plants
As your trees grow, they require ongoing care to thrive. Pruning for shape, consistent fertilization, gradual sun exposure, and vigilance against pests and diseases contribute to their overall health and fruit production potential.
Step 8: Ensure pollination for fruit production
Optimal fruit production depends on effective pollination. While many orange trees self-pollinate, you can facilitate the process by simulating gentle air circulation or engaging in hand pollination.
Step 9: Recognize pests and diseases
Staying vigilant against pests and diseases is crucial to maintaining the vitality of your orange trees. Regular inspection, prompt action against pests, and proper isolation of affected trees are key strategies.
Step 10: Celebrate your success
Finally, after months of dedication, your trees will bear fruit. Observe the ripening indicators, harvest the fruit carefully, and savor the sweet rewards of your labor. Continue to take care of yourself to ensure the sustained growth and future productivity of your orange trees.
a basket with oranges
Growing orange trees from store-bought seeds is an undertaking that requires patience, dedication, and a keen eye for detail. By following these steps, you’ll embark on a journey that connects you with nature and gives you the satisfying joy of homegrown produce.