
How to easily grow roses from cuttings! Compare the best and worst ways for potatoes and roots to spread through air layers of water or soil.
Perhaps you’d like to propagate a beautiful rose in your garden, or perhaps you’d like to grow several bouquets of roses for Valentine’s Day. It’s easy to wish for more colorful and beautiful rose bushes and vines in our homes and gardens.
How to easily grow roses from cuttings!
Many plant enthusiasts try growing roses from cuttings. There are many ways to propagate roses, such as: B. Rooting in soil or water, air layering, and some even try growing rose cuttings in potatoes! Some of these methods are excellent, but others don’t work very well.
Today we’re comparing the best and easiest ways to propagate roses from plants, cut flowers, and even bouquets. Wouldn’t it be nice to grow more roses in our garden or give them as gifts to friends?
Can painted roses reproduce?
The duration of the plant patent is 20 years, after which the plant can be propagated.
If the rose has been patented within the last 20 years, it is illegal to distribute it without the consent of the patent holder. (source)
However, there are countless rose varieties you can propagate. For example, the famous New Dawn rose and the Charlotte Armstrong rose were patented over 50 years ago, and old-fashioned, vintage roses are often easier to root than modern hybrid roses.
Now you know which roses are harmful for reproduction. Let’s look at the best and easiest ways to root rose cuttings!
The best time to grow roses from cuttings
The best choice is semi-hardwood cuttings harvested in late summer and early fall, when the new stems are partially mature.
Hardwood cuttings are the most difficult cuttings to root. They are harvested in late fall or early winter, when the rose stems mature and go dormant.
Semi-hard cuttings are best, harvested in late summer or early fall when the new stems are partially mature.
Hardwood cuttings are the most difficult cuttings to root. They are harvested in late fall or early winter, when the rose stems are mature and dormant.
How to Propagate Roses from Cuttings
Clean your tools
To propagate roses, you’ll need sharp scissors and a pot. But before you begin, it’s important to clean everything thoroughly.
A 5% bleach solution will kill potentially harmful germs and bacteria on your scissors. This is especially important if you’ve recently used pruning shears or if the pot has been recycled, as this could spread disease to the newly cut plant or the original plant.
Also, make sure your scissors are as sharp as possible. It’s difficult to cut cleanly with dull shears, which damages the stem and prevents the mother plant from healing. Damaged stems are much less likely to regrow, attract disease, and therefore lead to health problems.
Prepare the soil
It’s best to propagate roses in special rose soil to create the right conditions. If you can’t find rose-specific soil online or at your local nursery, you can also create your own by mixing equal parts coconut and river sand.
Coconut fiber stores more than ten times its weight in water, providing ideal conditions for root growth. River sand improves pot drainage and prevents stem rot.
Coconut fiber is a sustainable alternative to peat, so if you have some on hand, feel free to use it. Perlite also improves drainage and can be used as a substitute for river sand.
Mix the soil well and place it in pots deep enough to hold the stems (at least 10 cm). Water before planting and allow excess water to drain from the drainage holes to avoid washing away root hormones later.
Identify the stem
Next, it’s time to choose the perfect stem. It should be green and healthy, with no signs of damage or disease. When propagating in the fall, choose newly flowering stems, which combine death and reproduction.
The stems should also be at least 6 inches long, preferably 8 inches, and have some leaves. Measure from the base of the flower 6 inches beyond the nodes (points where the leaves emerge).
Take cuttings
Take sharp shears and remove the stem from the plant. Cut at a 45° angle to increase the surface area below the node. This is when the roots begin to grow, so don’t cut too narrowly to avoid damaging the plant.
It’s best to harvest cuttings early in the morning when the roots are saturated. Avoid removing cuttings during the hottest hours of the day, when the stems lack moisture, dry out more quickly, and are less likely to root.
Remove the leaves and the flower
Cut off the flowers at the top of the cuttings. At the same time, remove all flower buds from the stem. This directs the plant’s energy toward root growth rather than flowering.
Next, remove the lower leaves along the stem, leaving only the top leaves. The more leaves on the cuttings, the more energy the plant needs to survive.
The final cutting should have at least two leaves at the top and one or two exposed nodes at the bottom.
Split the stem
Take the lower end of the cutting and carefully divide it into quarters with scissors or a sharp knife. This step isn’t strictly necessary, but it will increase the rooting hormone levels on the stem and improve your chances of success.
You can also make one or two small slits in the outer layer of the stem instead of separating the entire stem. You’ll need a steady hand to avoid damaging the node above the cutting, as this would eliminate the possibility of root formation.
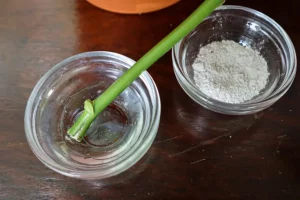
Immersion in rooting hormone
Rooting hormone is a powdered substance that stimulates root growth in cuttings and reduces the risk of disease. While not strictly necessary, it greatly improves rooting chances, especially for hardwood cuttings whose chances of rooting are already minimal.
Pour a small amount of powder into a separate container. This prevents contamination of the original bottle. Dip the cut end into water and then into the powder, ensuring all areas are completely covered.
Once finished, do not return any leftover root powder to the bottle, as this could spread disease. Instead, discard any excess material.
Factory
Use your finger or a pencil to dig a hole in pre-moistened soil deep enough to bury half of the cutting. Insert the cutting into the hole, avoiding touching the sides, so that as much rooting hormone as possible remains at the tip.
After planting, secure the cutting to hold it in place.
Plastic cap
Wood cuttings need a warm, humid environment to root. To create ideal conditions for root growth, you can create a mini greenhouse by covering the pots with clear plastic bags.
Insert sticks or skewers into the sides of the pot to hold the plastic in place. This will prevent condensation from dripping onto the cutting and causing rot. Then, place the plastic wrap over the baking sheet, covering the entire pot.
Leave the pot in a warm spot, away from direct sunlight, as this could burn vulnerable new shoots.
Post-implantation care
Continue to keep the soil moist by removing the plastic bag and spraying or watering regularly. When changing the bag, make sure there is enough air circulation to prevent the stems from rotting.
Root growth takes two to three weeks. If there is no new green growth, you can gently pull on the cuttings to see if roots have developed.
Once the roots have grown about an inch or two, or you notice new leaves growing on the stems, you can transplant the roses into your garden. Before planting, expose them to the outdoors for a few hours a day to acclimate and prevent shock.
If your outreach efforts fail, don’t stress. Root growth isn’t guaranteed and may take a few tries to achieve. Give them the right conditions, monitor moisture, and you should see roots growing in no time.