
on How to Make a Macrame Chair
Macrame is a knotted lace, created by knotting cords made of materials such as cotton, linen, hemp, jute, or leather threads. It is a very ancient technique, useful for a wide range of uses.
Below we will show you how to make a comfortable macrame chair .
You need:
3 cylindrical wooden rods 3 cm in diameter and 76 cm in length
2 cylindrical wooden rods 1.5 cm in diameter and 92 cm in length
182 meters of rope with a thickness of approximately 0.6 cm
7 meters of 1.2 cm thick rope
4×2.5 cm wood screws
Drill, tape measure and scissors
Instructions
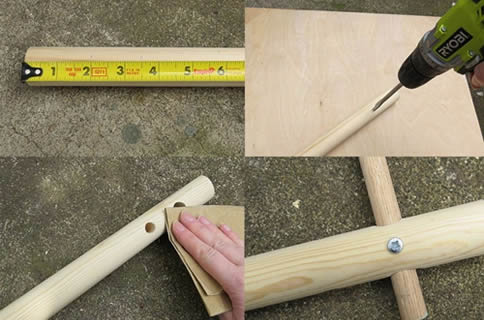
When measuring for drilling the cylindrical wooden rods, make sure all the holes are aligned with each other, so that you have a perfectly square structure. On two of the 3 cm diameter bars, measure and make two marks: one at 5 cm and one at 9 cm. Do this at each end of the bar. On the third cylindrical rod, which is 3 cm in diameter, you will need to make two marks, both 9 cm from each end.
macrame chair 1
Make a 0.5 cm deep hole on each 9 cm mark and a 1.5 cm hole on each 5 cm mark. Try to remove dust and sticks from the holes by cleaning them.
Create a square frame for the chair by inserting the small rods into the 1.5 cm diameter holes you just created. Leave at least 5 cm of them protruding at each end. Secure them with the 2.5 cm screws.
macrame chair 2
Before beginning the macrame process, hang the frame at a comfortable height for working.
Cut the thickest rope into 16 pieces, each 8 meters long. Take one of these strings and fold it in half. Wrap it around the rod, from front to back. Thread two more strands through to the end (see photo above right). Repeat this step with all the other pieces: in total, you will have 32 hanging strings.
To create the chair, you’ll need to use a simple square knot. Starting with the first four threads, take the left rope and cross it over the two middle ropes, then pass it under the right rope (i.e., the fourth rope).
Take the right rope and pass it under the two middle ropes. Then pass it through the hole, over the left rope.
macrame chair 3
To make the second half of the knot, you need to repeat the same process, but in reverse.
The next row uses the same square knot, but starts at the third string. Simply put, you’ll use two strips from each section. Continue tying until you’ve created all the strings.
Then repeat everything: as you started, make a square knot with the first 4 ropes. Then use the third rope to start the next row.
Continue tying until you reach a width of about 14 meters.
To join the ends of the bottom section to the frame, wrap the four strings from each section around the wooden rod and tie a knot.
Make a second knot. Divide the four ropes in half and tie the pairs together. Tighten them tightly to secure the knots.
Trim the ends.
macrame chair 5
Cut 3 meters of the thickest rope (1.2 cm thick), fold it in half and tie a knot at the top.
Use the third rod, the one in which you only made two holes. Pass the rope through the holes and tie a knot.
Continue with the same rope, passing it through the top of the chair frame. Leave about 75 cm of space between each frame. Tie a loose knot in case you need to make adjustments later.
Cut two ropes (the thicker ones) each 1.6 meters long. Starting at the bottom of the frame, thread a string through each hole and tie a loose knot. This time, the knot should be under the post, with the rope coming out the top.
Bring the rope up to the third (highest) rod and wrap it around it with a knot. Leave about 5 feet of space between this rod and the bottom of the chair frame.
You can now hang the chair in a permanent location using a sturdy hook. Make sure all the chains are level. Once this is done, you can tighten all the knots.